Series Index
Part 1: Introduction
Part 2: Setup
Part 3: Controlling the stack
Part 4: The Rails app
Part 5: Gotchas and final thoughts
Setup
Firstly, I use a MacBook Pro running Sierra. I’m sure this series can be easily ported to Linux with minimum effort. If you’re on Windows though, you’re on your own I’m afraid.
This demo is a simplified version of what I, and my team, actually use. I know it works because we use it every day.
Dependencies
The setup.sh script in this demo doesn’t check for any installed software. In my non-demo version I do a number of checks for software dependencies of my applications.
I’m assuming you already have Homebrew and Docker for Mac installed. You will also need these:
direnv
This is required for the setup.sh script.
$ brew install direnv
Dnsmasq
This service is required for the Nginx reverse proxy we will setup, allowing requests to be proxied from within a Docker container back to our host. More about this later…
Note that dnsmasq must be run with root privileges.
$ brew install dnsmasq
$ sudo brew services start dnsmasq
Filebeat
This is required for the forwarding of logs to Elasticsearch.
$ brew install filebeat
PostgreSQL
The pg gem (in the demo Rails app) has native extensions which require the presence of PostgreSQL binaries for installation. We don’t actually run this service.
$ brew install postgresql
watch
A very handy utility which we will use for real-time monitoring of our stack. I covered watch in previous article.
$ brew install watch
Setting up the stack
We are now ready to create our stack. Check out the docker-demo-stack repository and run the setup script:
$ git clone git@github.com:edjames/docker-demo-stack.git
$ cd docker-demo-stack
$ setup.sh
You should see something like this:
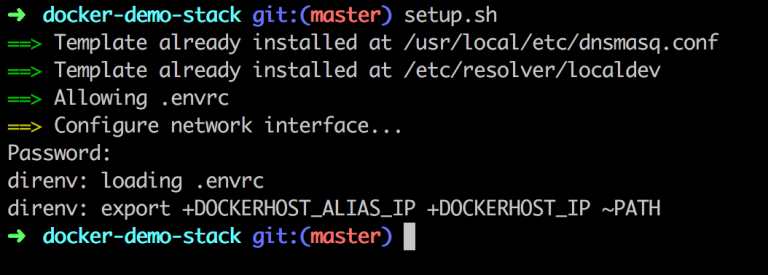
What just happened?
The setup.sh script does 3 things:
- Checks for the presence of
dnsmasqconfiguration. If it doesn’t exist or doesn’t match the templates, the configuration is created. - Ensure that the
.envrcfile is allowed and loaded bydirenv. - Restart the
dnsmasqservice, running as root.
This article provides a great explanation of dnsmasq setup (and what the setup.sh script has just done for you).
We are now ready to actually build our containers…

4 thoughts on “Real-world Rails development with Docker (Part 2)”